Already have quizzes you’ve created in a Word doc? There’s an easy way to automatically turn them into Schoology Quizzes. Follow the steps below and watch the magic unfold.
Open your Word doc or Google Doc that is a quiz.
2. Copy everything (use the keyboard shortcut CTRL and C to copy)
3. Go to a Blackboard quiz generator. Here’s one I tested out (shared by our Schoology guru): BB Quiz Generator
4. Give the quiz a name and paste your quiz (use the keyboard shortcut CTRL and V to paste). Make sure you double check for the formatting, otherwise some won’t be able to be viewed as question. Check out these tips for formatting: CSI BB Formatting
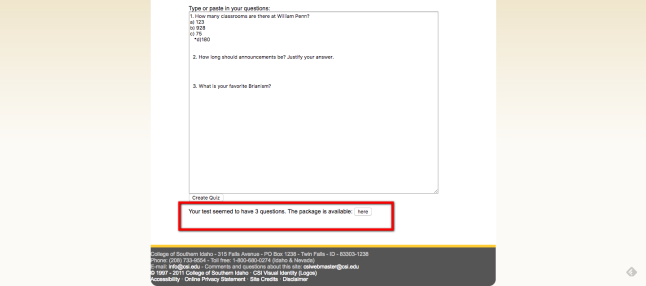
5. Click Create Quiz.
6. At the bottom you will see “You seemed to have X questions. The package is available here.” Click the word here.
7. Voila. You now have a zipped file in your downloads.
8. Now go to Schoology. In a course, select Add Materials.
9. Select Test/Quiz and give it a name and select the settings that work best for you.
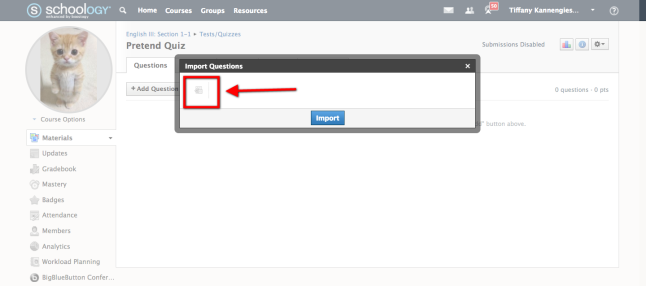
10. Choose Add Question.
11. Select Import Test/Quiz
12. Select Blackboard
13. Select the file icon and choose the zipped file in your downloads. Hit Import.
Chrome’s extensive extensions can be life-altering. Last year, I added one to enhance the look of Schoology – Boostogy. I literally chose to add the extension to trade in Schoology’s default square images for circles and our district’s khaki background for slate grey and blue. But today, I found a much better reason to add the extension.
When taking a test/quiz normally in Schoology, students lack the ability to actually interact with the text. Boostogy changes everything. Students (and teachers) who have this extension are given a box of goodies on the right-hand side.
Here are some of the cool applications of Boostogy’s features while taking a test/quiz:
Students can highlight evidence in a given reading by selecting the highlighter icon and then selecting the text they want to highlight.
2. With multiple choice question, students can select the X icon to cross out items they know aren’t the answer to aid with the process of elimination.
3. Students can underline, bold, or strikethrough any text by selecting either the underline, bold, or strikethrough icons.
Some additional notes:
To get rid of the annotations just hover over the item and click the X that appears on the left-hand side.
Also, after making an annotation, individuals must click the cursor icon to have the ability to interact with the quiz as normal.
As I think about how this can help most of my students, especially those who are struggling learners, I can’t wait to share it with not just my own students, but the other teachers in my building.
Questions or other ways to apply this in your class? I’d love to hear your feedback!
Time. Pace. Path. Place. These four pillars of blended learning, although very important, are hard to implement especially all at the same time. I was first formally introduced to them last year during my first BRINC professional development training. In all honesty, I was 100% convinced that these wonderful ladies were speaking only to teachers in magical schools that have less than 20 kids in a classroom and unicorns roaming the hallways. Were these ladies trying to tell me that I was going to get all 34 of my students doing a different thing at a different pace?! The idea sounds great, but how could I possibly get my students who often struggle with simple directions to each follow a separate set of directions?
The idea is crazy. Truthfully, there are so many different institutional practices that must change before an environment like this is possible 100% of the time. And to easy my anxiety, my mentor/coach, Sarah, reassured me that there was no magic spell I could cast and poof! there would be a class working seamlessly together, yet at different paces, in different places, on different paths, at different times. Her suggestion: baby steps.
Here was my first attempt:
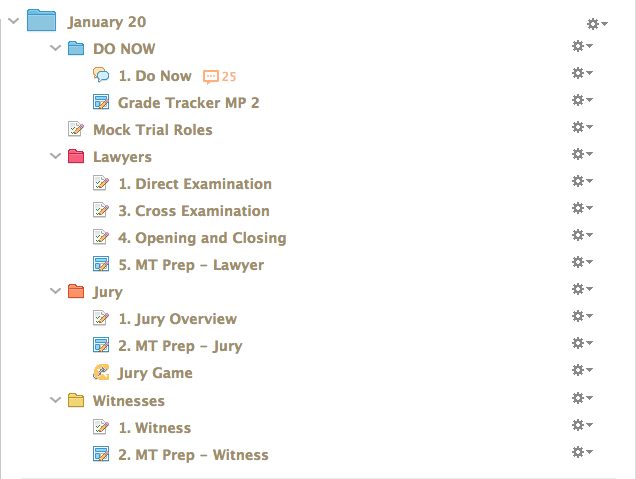
My students started a final project for a unit on Of Mice and Men. This unit project was the intro to argumentation. After reading the novella, students participated in a mock trial where one of the main characters, Lennie, was put on trial for killing Curley’s wife. (Yes, I know Lennie dies, but the writing project that follows works best with Lennie on trial).
First, I had students participate in a jigsaw/Internet Reciprocal Teaching activity to research the different roles in a courtroom. They posted their findings on Padlets made visible to the whole class on Schoology. Students created job descriptions on the topic they researched.
Students then worked with a partner of their choice to learn even more about the courtroom by competing against each other using an interactive courtroom game from Scholastic’s website. At the end, they used what they learned to “apply” for whichever job they thought they were best suited for. They applied using Schoology‘s quiz feature, giving their best argument for why they should be selected for that job.
The next couple of days, students were able to work with partners to prepare for the trial. This is where Schoology’s folders and individual assign feature came in handy!
Based on their role, students had different assignments to complete and pages to view. While the prospectors and defense lawyers were working on creating opening and closing statements for the mock trial, jury members were analyzing a compilation from My Cousin Vinny and determining the strengths and weaknesses of the arguments being made.
I was elated that all of my students could be working on different assignments at the same time in harmony. This was simply a baby step in the direction. It made me hopeful that this could be a more normal experience for my students. Although it made me do a little happy dance, I have to admit it was A LOT of extra work. Think about it, instead of one lesson, one assignment, one assessment, multiple lessons, assignments, and assessments had to be created. The outcome, though, was worth it. I’m looking forward to making steps to giving my students opportunities to learn in a completely blended environment.
My teacher preparation program prepared me to participate in PLCs – Personal Learning Communities. But most educators refer to PLCs most frequently as educators who teach the same content, or grade level as them. These communities do not traditionally extend beyond the walls of your school. While attending ISTE this year, the buzzword “PLN” was thrown around every where. What I learned was these PLNs, or Personal Learning Networks, were built up of educators from around the world. The best way to grow your PLN? Twitter.
Twitter is pretty boring if you’re not following people. The best way to find inspiring educators to follow? Hop in on a Twitter chat. A Twitter chat is a scheduled discussion that uses a common hashtag, lasting 30 minutes to an hour. The moderator will post a question, using Q1 or Q2. Those who want to participate will answer with A and the number of the question they are responding to.
Q2-What types of communication methods do you use to engage all stakeholders into your goal(s)? #delachat
Twitter chats are also great because you don’t have to devote a large chunk of time for them. Last night, I took part in/lurked on four different chats. You can choose to open up tabs and flip back and forth between multiple chats, or try using Tweet Deck to view multiple threads. Even if you don’t feel comfortable responding to the Qs the first time, lurk and take in some advice of the participating educators. Find those you feel the most inspired by and follow them.
Most Twitter chats have schedules. Find chats that fit your schedule, connect with educators in your location (you can always join in on chats for other areas, too), and grow your PLN! Don’t forget to view live posts instead of top to make sure you don’t miss a beat. Here are some that I’ve participated in:
#delachat – Delaware educators (Remember, anyone can join regardless of location) Thursdays 4:30pt/8:30et
A few weeks ago, I was taking part in #delachat and saw someone tweeting about #EdcampDVIS. I had heard quite a bit about how AWESOME edcamps were, so I contacted Karen Huang for more info. To my disappointment, I learned the DVIS stood for Delaware Valley Independent Schools. I teach at a public school in Delaware, so I figured I probably wouldn’t be invited. The exact opposite was true. Karen encouraged me to come, and that little nudge was all I needed to sign up.
If you’ve never been to an edcamp, the philosophy is like an “unconference.” There are no set topics. The morning started with me sitting surrounded by strangers. As we began talking, multiple people at the table showed interest in Remind, a tool used to open the lines of communication among parents, teachers, and students. I thought, hey, maybe other educators here might be interested in the topic, too! Anyone with a session idea is encouraged to create one by putting it on a sticky note and adding it to the program set up on the wall. After adding Remind, we got talking about Twitter in the classroom, so that went up on the board, too.
I split my first session between one about Shakespeare and tech, presented by The Philadelphia Shakespeare Theatre, and another about blended learning. The latter was set up similar to a socratic seminar. The desks were formed in a circle, and there was no presenter, just educators discussing how to make an effective classroom using tech. I was in NO WAY prepared to be a facilitator, but that’s the great thing about edcamps. Literally no preparation is required. We met in one of UPenn’s rooms. I modeled how teachers get students to sign up, and then we spent the hour discussing the ways to use Remind in the classroom, how to create your own classes, and the pros and cons of using the tool. It was invigorating sharing tools with teachers with so much passion! The Twitter session was similar in that I showed them what I had done in the classroom, but the discussion led to digital literacy, ownership, and engaging reluctant learners. Some of the members discussed how if teachers are afraid to use the tools our students are using in their personal lives, we won’t be able to teach them how to use the tools in responsible ways.
It was 3 p.m. and I couldn’t believe how fast the day had flown by. I could have stayed at this edcamp until 8! It baffles me that more professional development is not structured like this. If we, as teachers, are taught to abandon the archaic structure of long lectures, why would we structure our own learning like this? Professional development should include the voice of those who are learning. Professional development should be exciting, engaging, and more edcamp-y. This experience had me hooked, and I’m looking forward to the many, many edcamps to come!
I’ve been searching for ways to mirror my iPad on to my computer, and then my Smartboard, particularly with apps like Class Dojo. I’ve noticed my students love the ability to see performance in real time.
The wonderful Leslie Fisher posted a quick video of how to do this with Yosemite, but unfortunately it only applies to iPad 3 or items that work with lightning cables and Mac computers. I’m not too hip and stuck with an iPad 2 and our school works off of PCs, so I was forced to find other options. I stumbed upon Tony Vincent’s Learning in Hand blog. He posts 10 different ways to hook up any iPhone or iPad to a projector and includes a bomb diggity infographic comparing and contrasting the different methods. I’ve combined some of his free tips with some research of my own.
$14.99 to download. You’re able to mirror just one application or your whole screen. Can be shared over Chromecast, via Apple TV, or through Reflector. You’re also able take over multiple screens at once. Great for classroom instruction!
I love Google Slides. Slides is one of the ways my students receive information. While I love the ability to collaborate using Google Slides, I’m not in love with the measly 20 templates I have to choose from. Quite frankly, they aren’t the most visually appealing.
In an attempt to spice things up, I stumbled upon Slides Carnival. They offer 36 beautifully designed themes that are sure to make your presentations even more bomb diggity. Check out some of my favorites:
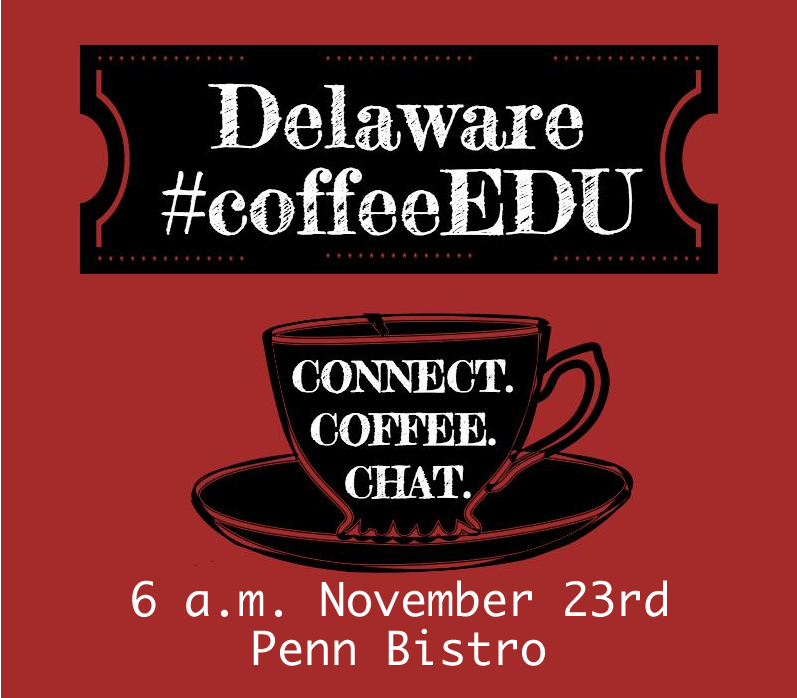
I am not a morning person. Very few people are able to get me up, dressed, and chatting at 6 in the morning. Alice Keeler is one of those people. My favorite moment from ISTE 2015 was actually an event that was not on the ISTE official schedule: #coffeeEDU. I knew little about what #coffeeEDU entailed, but what was the worst that could happen? Stuck in Starbucks with a coffee? I was in.
Once I arrived I totally bought in. #coffeeEdu is the epitome of an unconference. There are no scheduled topics and never lasts more than an hour. My #coffeeEDU colleagues chose to discuss teaching tech in PD.
We broke into small groups of 4 to 5 people. Our group, made up of educators from 3 different countries, shared successes, failures, and tips. Each gained something from others’ unique experiences. In my opinion, it was the most organic version of learning and growing.
What: Drink coffee, build your PLN, teach, and learn.
When: 6 a.m. November 23
Where: William Penn High School’s Penn Bistro
Can’t make it to this one? Text @decoffeeed to the number 81010 to sign up to join my Remind class. You’ll get reminders about future #coffeeEDU events in the area!
If you haven’t jumped on the Remind fanwagon yet, do so immediately. I’ve been using Remind, formerly known as Remind101, since my days as a student teacher. It was a great mode for me to send out homework reminds, school updates, and basic reminders to my students. I loved it from the start. Students dealing with block scheduling no longer forgot books or homework. It opened a communication line from teacher to student , albeit only one-way, it was a game-changer.
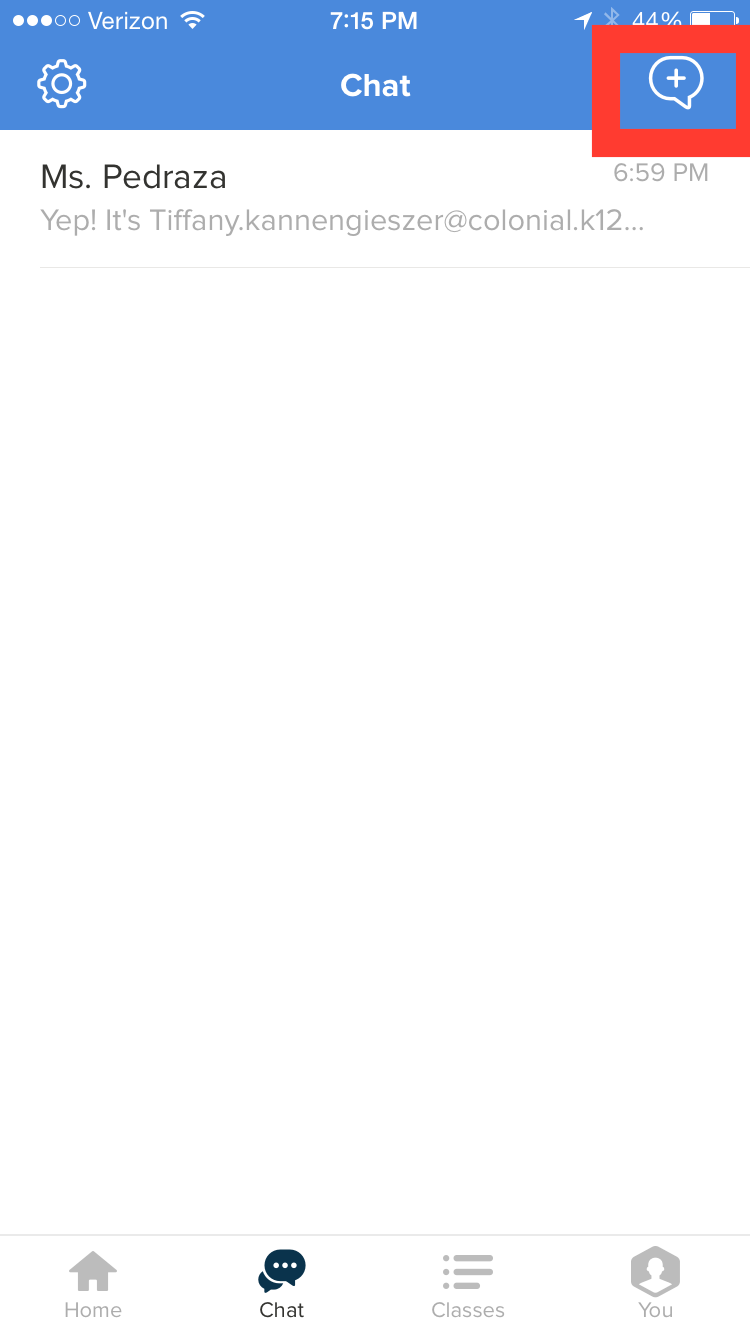
One of the biggest complaints from my students was that Remind wouldn’t let them reply back to my reminders. Of course, Remind came up with a solution for that. Recently, they released their Chat feature allowing teachers to start chats with individual students. This summer, they took it up another notch and released the Group Chat. If you haven’t checked it out, put it on your list of must-dos before the school year. Here’s some tips to get started :
1. On the app, a new Chat tab appears next to Home.
2. Click the plus sign in the word ballon to start a chat.
3. Select up to nine students, parents, or teachers. What’s great is the safety and security of individual Chat still applies: message history is always available and numbers are always kept private.
4. Be sure to set up your preferences as a teacher. In settings, you can turn on your office hours for the best times people can chat with you (Note, people can still start chats even outside the office hours, but will be notified they are doing so). In settings, you also have the ability to decide if students or parents can start chats with you. Students can only start chats with you, and only a teacher can start a group chat.
***Students who don’t have the app can also start individual chats by responding @Chat to any remind number.
How can you use this in the class? Try using this feature to hold discussions with a student and his parents. Discuss deadlines, plans, and ideas with members of your PLC. Help a group of students struggling on a homework assignment. I’d love to hear ways you plan to use these group chats in your class!
What’s a better way to kick off my blog than by sharing about my first day of my first ISTE Conference? For those of you who don’t know, ISTE is the mecca of tech conferences. Attended by more than 20,000 lovers of tech, the four day conference is filled to the brim with potential connections, learning, and tools galore.
For my first session, I headed to Paying it forward: Leveraging Female Voices in Ed Tech. The panel made up of five powerful, resourceful, and successful women, discussed the disparities between men and women leaders in the tech world. Ellen Bialo, Julie Evans, Margaret Roth, Kari Stubbs, and Mila Fuller also spoke to the importance of making a change, and building a culture where young girls feel empowered and inspired to enter STEM fields. As a young educator, their words and stories of success gave me the motivation I needed. Stubbs spoke about viewing challenges not as impenetrable obstacles, but opportunities, because the worst they can say is no, right? They also discussed great PLNs to support women including Ed Tech Women, INWEL, and DOLS. After the too-short-hour, I walked away ready to work on my leadership skills, look for mentors, and spread the word about #edtech4women.
Next, I headed to the Expo hall. I, of course, made sure to stop by my favorites: Google For Education, Schoology, and Curriculet. They were among the hundreds of booths passing out sweet swag, and doing demos showing the bells and whistles of their platforms.
Another awesome session ended my first day. Hot Tech Tools for Today’s Classrooms, led by Leslie Fisher, Lesley McClendon, and John Sessler from PBS, was PACKED full of useful, mind-blowing tech tools in the classroom.
Aurasma – A free app, Aurasma allows teachers to create and engage students in augmented digital reality. Teachers can upload pictures and then connect videos, quizzes, information to the image. Students, or really anyone else, can view your enhanced material by using the app. This immediately brought to mind my classroom library and connect students’ book chats to images of the covers of books I have in my library
Quiver – Another free app, Quiver allows students to print out coloring pages, color them, and then see them come alive with the app! Quiver now features educational pages including volcanos, animal cells, and maps that offer quizzes, and 3D images that really take learning and understanding to the next level.
Elements 4D – I was completely blown away by this app. Leslie had wood blocks with the elements on them. When viewed with the app, you could see what the element actually looked like. For example, the oxygen block showed air, but when paired with the hydrogen block water appeared. I can only imagine what my chemistry experience would have been like with this cool toy. And even better, they offer free paper versions of their blocks here.
Timeline JS – This one hit right home. Timeline JS makes it easy for not just teachers, but also students. They provide an template in Google Sheets. Users can modify it and connect text, images, videos, and quotes to display beautiful timelines. How perfect is this to connect history and ELA?
Google Tour – Google has done it again. With Google Tour, users can show a character’s journey, historical figure’s path, or animal’s migration. They can connect places and path with video, images, and text as well.
Seesaw – Students can use this app to display their understanding; meanwhile, creating a digital portfolio. They can respond to assignments by attaching files, videos, notes pictures, or using the whiteboard feature. Parents also have the opportunity to sign up and receive all assignments. No need to worry about lack of space on the fridge, Seesaw makes it easy for parents to share their children’s work on social media.
Go Formative – A cool way for students to draw responses for assessments, Go Formative takes formative assessments beyond multiple choice. This seems like the perfect way for students to show work for math problems, or express understanding using visuals.
Plickers – Don’t have enough devices for every student? No problem. Plickers makes it easy for educators to get real-time feedback without students having to have individual devices. After a question is posed, students hold up cards with unique scannable cards linked to individual students. With a quick scan with the app, the teacher is quickly able to assess understanding.
I left this session giddy. While not every app applied to my own classroom, I couldn’t wait to share them with educators I knew would love them!
After leaving ISTE after my first day, I left ignited and ready to fill up my teacher tool belt to the brim the next day. Check in tomorrow for more highlights and to see what cool tech fun I take away from day 2!